
When teeth are trapped beneath the gums are grow partially into the mouth, this is called an impassioned. This can occur when there isn’t enough space in the mouth for teeth to emerge properly. While some impacted teeth can simply be extracted, impacted canine and other adult teeth must be guided into their proper place for a healthy and functional bite. Exposure and bonding are one of the most effective treatments for impacted teeth and children teens and in some cases even adults. During this procedure, our team makes room for the impacted tooth to grow into the mouth. We will then carefully expose the tooth by removing overlying bone and gum tissue to attach a small bracket and chain. Your dentist then uses this to carefully guide the impacted tooth into its proper place. Our main goal is to focus on the individual needs of every patient and provide them with a comfortable and satisfying experience.
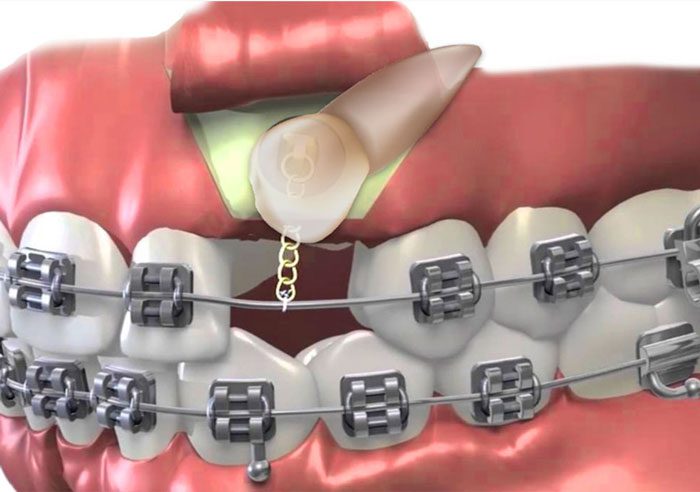
One treatment option is to surgically expose the canine, either allowing for unassisted eruption or, through the use of orthodontics, bring the impacted tooth into occlusion.
Periodontal Surgery for Impacted Canine Exposure
An impacted canine tooth fails to erupt or only partially erupts, on either the palatal or facial aspect of the jaw. While impaction of canines is often due to localized causes such as insufficient space in the dental arch, sometimes the causes are unknown.
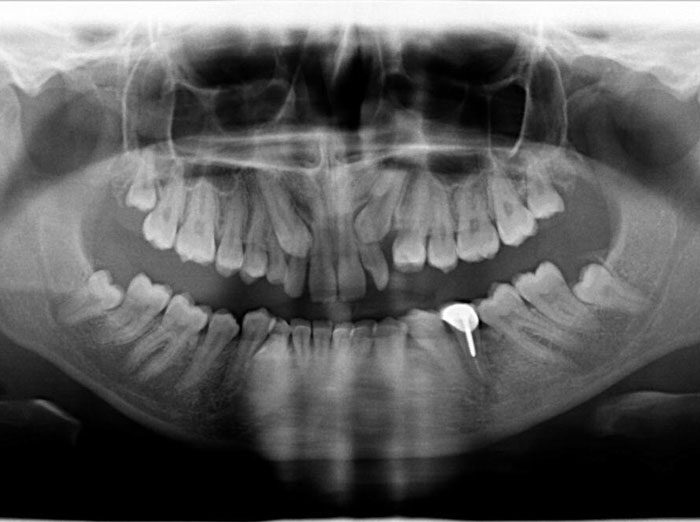
First, the patient must be clinically and radiographically assessed to determine the horizontal, vertical and mesiodistal position of the impacted tooth.
With complicated impactions, cone-beam tomography can be used to obtain information about the precise location of the impacted tooth as well as its proximity to the adjacent teeth. The width of available keratinized gingiva must also be assessed at the initial examination. The information gathered during the examination process is used to decide which of the treatment options will be selected.
The patient is instructed to avoid chewing on the surgical site for two weeks following the surgery and to rinse with 0.12% Chlorhexidine twice daily for 2 minutes until the surgical site is comfortable and normal hygiene procedures can be resumed.
Palatally Impacted Canine
To expose the palatally impacted canine, the facial and palatal tissues are anesthetized by local infiltration. Once anesthesia is confirmed, a section of the palatal tissue is excised, using a 15 or 15C scalpel blade or a tissue punch. This allows for access to the underlying bone. The bone covering the crown of the impacted tooth is removed using rotary and/or hand instruments. To minimize any future attachment loss, no bone surrounding the root is removed.
Management of the Newly Exposed Tooth
There are two methods for the management of the newly exposed tooth.
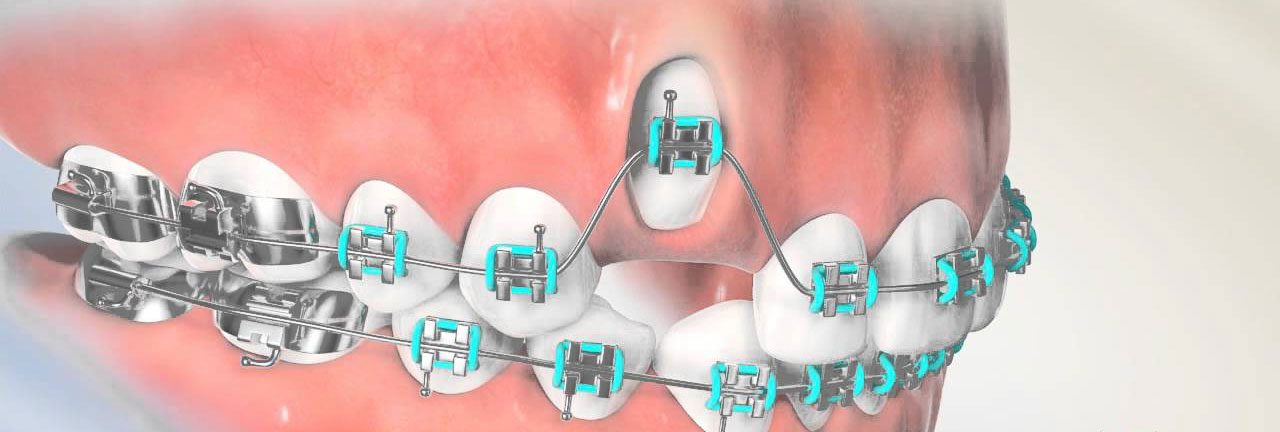
- The first is to allow the tooth to erupt naturally, and unassisted. This can only be accomplished if the impacted tooth has a good axial inclination and does not need to be upright. When allowing for an unassisted eruption of the tooth, if the palatal mucosa covering the impacted canine has been completely removed, a periodontal dressing is used to cover the surgical site for 3 to 8 weeks. This will prevent the re-growth of soft tissue around the recently exposed tooth. The dressing may require replacement as it tends to become dislodged and is often lost during mastication. The eruption can be allowed to occur naturally until the canine is at the level of the adjacent teeth, after which orthodontics can be used to move the tooth into proper alignment in the dental arch.
- The second method is to guide the eruption of the tooth using light orthodontic forces.
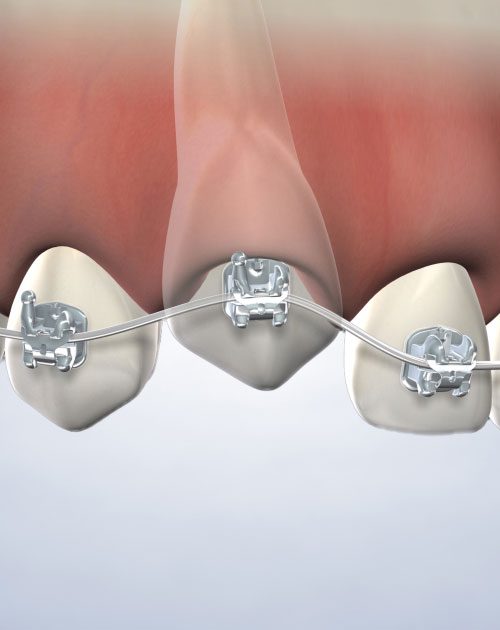
Once the canine crown is exposed, an orthodontic attachment such as a bracket is bonded to the tooth. This can be accomplished either at the time of the surgery or after a period of healing of approximately 2 to 6 weeks. The decision to bond a bracket at the time of surgery depends on whether the surface of the exposed canine can be isolated well enough to allow for enamel conditioning and bonding. Often, due to limited access to the entire facial aspect of the impacted tooth at the time of surgery, the bracket is bonded in a less than ideal position. This can be easily corrected once the canine crown has fully erupted.
Labially Impacted Canine
For labially impacted canines, enough space must be created in the dental arch before surgical exposure, to guide the tooth into position. Based on the treatment plan, if enough space cannot be created, the impacted canine or the adjacent first bicuspid may have to be extracted. There are three methods of exposing labially impacted canines. For each of these methods, the first step is to anesthetize the surgical site by local infiltration.
- The first method is surgical exposure with apical repositioning of the labial flap. A 15, 15C or 12 scalpel blade is used to make an approximately 12mm wide horizontal incision into the mid-coastal area of the ridge coronal to the impacted tooth. This is followed by two vertical releasing incisions connecting the horizontal incision and extending apically into the vestibular mucosa. A split-thickness flap is elevated using the scalpel blade and periosteal elevators. If present, the bone covering the facial aspect of the canine crown is carefully removed using rotary and/or hand instruments such as chisels, ensuring that the enamel of the impacted canine is not damaged. The flap is then repositioned apically and sutured in place with horizontal sutures using 5-0 or 6-0 resorbable or non-resorbable sutures. The keratinized portion of the flap is positioned so that it covers 2 to 3mm of the enamel and the cementoenamel junction of the exposed tooth. Once the flap has been sutured in its apical position, an orthodontic bracket can be bonded to the exposed enamel and secured passively to the archwire via a ligature wire or a chain. These are then activated one week post-operatively. If non-resorbable sutures are used, they must be removed 1 to 2 weeks post-operatively.
Closed Eruption Technique
- The second method is the closed eruption technique. It is used in cases where the impacted tooth is farther from the labial cortex, and ideal apical positioning of the soft tissue at the time of surgery is not possible. In this technique, a mucoperiosteal flap is raised just enough to expose the bone covering the crown of the impacted canine. The bone is carefully removed using rotary and/or hand instruments such as chisels, ensuring that there is no damage to the enamel of the impacted canine. A bracket can be bonded to the tooth and secured passively to the archwire via a ligature wire or a chain. The flap is then replaced and sutured in its original position. The bracket is activated after the post-operative appointment. Final soft tissue recontouring is postponed until after the completion of the orthodontic treatment.
Window Through the Soft and Hard Tissues
- The third method for the exposure of labially-impacted canines is the creation of a window through the soft and hard tissues overlying the crown of the impacted tooth. The location of the impacted tooth is identified and a section of labial mucosa approximately the size of the canine crown is excised using a scalpel and a 15 or 15C blade. The underlying bone, if present, is removed carefully using rotary and/or hand instruments such as chisels, ensuring that the enamel of the impacted canine is not damaged. A bracket is bonded to the exposed crown at the time of surgery and activated after the post-operative appointment. This method is rarely used as it results in the canine lacking keratinized free and attached gingiva which makes it more prone to inflammation and subsequent attachment loss. In such cases, a free tissue graft can be placed on the facial aspect of the canine once it has been aligned in the dental arch.